Thursday, July 29, 2021

Introduction to model-driven apps and Dataverse

Introduction to Model-Driven Apps and Dataverse 

Dataverse:-
Dataverse is the ideal data source because it is the foundational data source of Microsoft Power Platform. Dataverse is having most functionality, the deepest integrations, the most features, and the best ease-of-use of any available data sources. Microsoft Dataverse is a straightforward platform that you can use to begin designing your data structures. Another benefit of using Dataverse is that all of your data is stored in tables. A table is a set of records that is used to store data, similar to how a table stores data within a database.

Some benefits of using Dataverse and its tables include:
  • Simple to manage
  • Helps secure your data
  • Access your Dynamics 365 data
  • Rich metadata
  • Logic and validation
  • Productivity tools
Model-Driven Apps:-
Model-driven apps use a component-focused approach to develop the app. When developing canvas apps, you have complete control over the appearance and behaviour of your app, whereas with model-driven apps, the layout is mainly based on the components that you add to the app.

Model-driven app design provides the following benefits:

  • Rich component-focused, no-code design environments
  • An ability to create complex responsive apps with a similar UI across a variety of devices from desktop to mobile
  • Robust design capability
  • Apps can be distributed as a solution

Microsoft Dataverse and model-driven apps working together:-

When creating a model-driven app, you can use tables from Microsoft Dataverse as your building blocks. Model-driven apps start with your data model, building up from the shape of your core business data and processes in Dataverse to model forms, views, and other components.

Imp point while creating model driven app:

  • Modelling business data
  • Defining business processes
  • Composing the app.

How to build a model-driven app

 How to build a model-driven app

What is Model-Driven App:-
Model-driven app design is a component-focused approach to app development. using Model-driven app you can make  simple to very complex app. model-driven apps and largely designated by the components you add to the app.


Building blocks of model-driven apps:-

Data:

The table below shows the different data components that can make up a model-driven app which can determine what data the app will be based upon. It also shows what designer is used to create or edit the data component.

User interface:

The table below shows the user interface components which determine how users will interact with the app and what designer is used to create or edit the component.


Visualization:

The visualization components determine what type of data and reporting the app will show and have available and which designer is used to create or edit that component.


Create a model driven app:-

  • Sign in to Power Apps by using your organizational account.
  • Select the environment you want, or go to the Power Apps admin center to create a new one.
  • On the Home page, select Model-driven app from blank.
  • Click Create.

  • On the Create a New App page, enter a name and description for the app.
  • Select Done. Your new app appears in the App Designer, and you can now add components to it.

Add components to your app:-

You add components to your app by using the App Designer.

  • Select the Open the Site Map Designer pencil icon to open the site map designer.


  • in the site map designer, select New Subarea, and then, in the right pane on the Properties tab, select the following properties:
             Type: Entity
             Entity: Account

  • Select Save And Close.
  • In the App Designer, select Forms, and then, in the right pane under Main Forms, select the Account form.

  • In the App Designer, select Views, then select the following properties:

                   Active Accounts
                  All Accounts
                  My Active Accounts
  • In the App Designer, select Charts, then select the Accounts by Industry chart.
  • On the App Designer toolbar, select Save And Close.

Create a form:-

  1. On the left navigation pane, expand Data, and then select Tables.

  2. Select a table, such as the account table, and then select the Forms tab.

  3. Select Add form, and then select one of the following

    • Main form The contents of the new form are filled using the existing main form definition. If multiple main forms exist, the form at the top of the list in the form order is used to fill the new form.

    • Quick create form

    • Quick view form

  4. When you are done making changes to the form, select Save to save the form.

Publish your app:-

On the App Designer toolbar, select Publish. After you publish the app, it is ready for you to run or share with others.

Wednesday, July 28, 2021

Load/export data and create data views in Dataverse

Load/export data and create data views in Dataverse

 In Dataverse you can load data into table or export tables from other tables by using Microsoft Excel. You can also create views to quickly review data that is stored within an table.

How to create and edit view:-

 these are steps to create and save views of data in a table:

  1. Sign in to the Power Apps portal.

  2. On the left pane, expand Data and select Tables. Select the table that is associated with the data that you want to view.

  3. Select Views on the menu at the top of the screen.

Selecting Views opens a list of views of data that is associated with the table. You can open an existing view or create a new view.

Load data into an entity:-

To load data into a table, use the following steps:

  1. Prepare the file template.

    a. Export the table data to the CSV file.

    b. Define a plan to make sure that the data is unique. Use either primary keys or alternate keys.

    c. Ensure that data is unique before you import it into a table.

  2. Copy data from your Microsoft Excel or CSV file into the template that you just created.

  3. Import the data into a table.

    a. Sign in to Power Apps.

    b. On the left pane, expand Data and then select Tables.

    c. Select the table that you want to import data into.

    d. Select the ellipsis (...) or menu at the top. Select Get data and then select Get data from Excel.

    e. On the Import data screen, choose whether to import data from an Excel or a CSV file.

    f. Select Upload.

    g. Choose your file. Follow the prompts to upload your file.

    h. After the file is uploaded and mapping status is green, select Import in the top-right corner.

    i. You can use Excel to add, update, or delete data and fix any mapping errors.

Export data from an entity:-

export data from an entity by using following steps:

  1. Sign in to Power Apps.

  2. On the left pane, expand Data and select Tables.

  3. Select the table that is associated with the data that you want to export.

  4. Select the Export data button on the top menu.

Add, update, or delete data in an entity by using Excel:-

Microsoft Dataverse can help you add, update, or delete data in an table by using a Microsoft Excel add-in feature.

  1. Sign in to the Power Apps portal.

  2. On the left pane, expand Data and then select Tables.

  3. Select the table that is associated with the data that you want to export.

  4. Select the Open in Excel button on the top menu.

  5. Sign in to Dataverse by using the Excel add-in located on the right-hand pane.


Working with choice

 Define choice:-

Choices provide an exact list of values that people can choose.
You should not use choices when the field usually contains unique entries that are not easily standardized.
Choices are managed as a separate list and then associated with a drop-down field. 
When used properly and closely managed, choices help ensure consistent data entry and improves the quality and usefulness of the data that you collect.
choices can help create meaningful reports and identify trends and clusters of data.

Explore and learn what standard choices are available in Dataverse by following these steps:-

  1. Sign in to the Power Apps portal.

  2. On the left pane, expand Data and select Choices.

  3. Scroll through the list of over 100 standard choices. Select one of the standard choices and examine the default list of entries for that choice.


Create a new custom choice:-

To create a new custom choice by using the choice functionality in the Power Apps Portal, follow these steps:

  1. Sign into Power Apps.

  2. On the left pane, expand Data and select Choices.

  3. Select New choice on the menu at the top of the list.

  4. Enter a PC Type for the Display name.

  5. Add the following items to the choice:

    Laptop

    Desktop

    Tablet

    Server


Create and manage tables in Dataverse

 Table in Dataverse:-

In Dataverse, a table is a logical structure containing records that are made up of rows and columns. Dataverse tables differ from a simple database table because they have nearly 100 properties that are used to define relationships between other standard tables and how the table is used within Dynamics solutions from Microsoft.


Types of tables in Dataverse:-

The four types of tables are:-

Standard - The base set of tables that are created for every instance of a Dataverse database. You can add more columns to any table, but you cannot delete any column from a standard

Complex - tables that contain complex, server-side business logic, including real-time workflows or plug-ins. To use complex tables, users are required to have a P2 or Dynamics 365 license

Restricted - Certain tables that are tied to Dynamics 365 application functionalities require each user to have the corresponding license for that Dynamics 365 application if they want to create, update, or delete rows within the restricted tables.

Custom - Are created for a specific business application.


Licensing requirements for each table type:-

  1. Standard and custom table        -        microsoft365, Per app plan, Dynamic365
  2. complex table                            -        Per User plan, Dynamic 365
  3. restricted Table                          -         Specific Dynamic365 application licenses


 Create a custom table:-

  1. Sign in to Power Apps.

  2. On the navigation pane, select or tap Data to expand it and then select or tap Tables.

  3. Select New table in the command bar.

  4. In the New table panel, in the Display name box, enter the name of your new custom table.

  5. To add a column to the table, use the following procedure:

    1. In the command bar, select or tap Add column to open the column properties panel.

    2. In the Display name box, enter the name of the column that you want to add.

    3. From the Data type drop-down list, select the type of data that you want to add.

    4. Select and change the Required dropdown if desired.

    5. Select or tap Done.


Enable attachments within a table:-

  1. Sign in to Power Apps

  2. Select Data and then Tables on the menus on the left-hand pane.

  3. Select a table and then select Settings.

  4. Select the Enable Attachments check box.

  5. Select Done.

  6. Select Save Table at the bottom to save your changes.


Manage Apps In Power Apps


Manage app versions in Power Apps:-

To manage an app, select Apps from the solution explorer. Then select the app that you want to manage, or select Commands () next to the app name, and then select commands from the drop-down menu.


App details:-

The Details option shows the owner of the app, when the app was created and last modified, app ID and license designation.


Restore an app:-

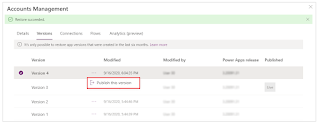
A canvas app can have multiple versions. You can restore an app to an available published version.

To restore an app to a specific version:

  • Select Versions from the app details screen.

  • Select a version other than Live that you want to restore.
  • Select Ellipsis for versions..
  • Select Restore.


  • Select Ellipsis to publish restored version. for the restored version.
  • Select Publish this version.


  • Review the app preview and select Publish this version to confirm.


The Versions tab now shows the restored version as Live:

Delete an app:-

Select Delete to delete an app. When prompted, select Delete from cloud to delete the app.


Rename an app:-

To rename an app:

  • Edit the app in Power Apps Studio.
  • Select the app name from the top-right.
  • Update the name.


  • Select Save.

Change app icon and description:-

To change the app icon and description:

  • Edit the app in Power Apps Studio.
  • Select Settings.
  • Update the icon and description.
  • Select Save.


Create & Manage Environment in Dataverse

 Environments in Microsoft Dataverse:-

An environment is a way to create and manage an instance of a Dataverse database. It also lets you manage user access, security settings, and the storage that is associated with the Dataverse database within that environment. You can create one or many environments, depending on your needs. Also, you can set up an environment based on a geographical location.


Create and manage an environment:-

  •   After selecting the New Environment button, you can name the new environment, select the region, and then select the environment type, such as trial or production.
  • Select the Create environment button.

How manage settings in an environment:-

Completed
  1. Sign in to Microsoft Power Platform Administration Canter .

  2. Select Environments in the left-hand pane.

  3. Select the environment to monitor or edit settings.

  4. Select the Edit Settings link. On this screen you can edit details about the environment, including Name and security groups who can access the environment. You can also see the current version of Dataverse and apply any updates manually as desired.

Introduction to Power BI

    Introduction to Power BI What is BI? Business intelligence is a technology-driven method that helps you to analyze data and to provide a...